Monday, April 30, 2012

Grandma's Dresser #2

As seen in mt previous post, I have inherited a bedroom set.  It took some time to convince my self to paint it but once I fixed up one piece, I was ready to start working on the rest.  This piece was a long dresser with an detachable mirror.  I thought it would make an EXCELLENT TV console.  It is the perfect size and I could still store things I don't use that often (perfect for winter items an accessories!).

Supplies
Paint
New handles and knobs
Drill

What I did
I started by sanding down the areas that needed some help and wiping everything down. I filled the previous holes from the knobs, then it was as simple as a couple coats of paint.   Once the paint was dry, I measured where I needed the new holes and drilled.  I attached the knobs and that was it. 

    
Before

After


What I'm working on next:
As I am moving in a few days, I will be taking a short break, but don't worry because there will be many more projects to come!!!

Wednesday, April 25, 2012

DIY Headboard

I have purchased a new bed for my new apartment and I was most excited about getting a new headboard!  I have been searching for the perfect upholstered headboard and after seeing the RIDICULOUS prices I finally decided to make my own.  The adventure started at Home Depot when I clearly didn't realize the size of my car and I drove the 6 miles to my apartment with wood strapped to the roof going 20mph on a very busy road.  Either way it was worth it!

Supplies
2 2x4s cut to the desired height
Plywood cut to dimensions based on bed size
Foam
Batting
Fabric
Staple gun
Buttons, upholstery needle, and upholstery thread (if desired)

What I did
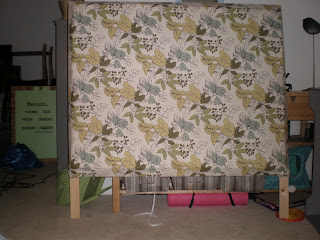
First measure the width of your bed to determine the width of plywood needed.  A queen bed is a standard 60 inches wide.  Then decided how high you want your headboard to be.  I wanted my headboard to be 5 feet from the ground.  I bought my wood at Home Depot and they will cut wood for you in store.  I got 2 2x4s cut to 5 ft and my plywood cut down to 5 ft.  Standard plywood is 4ft x 8 ft so my final piece was 4ft x 5 ft.  (The 1 ft short in height is fine because it wont be seen either way).  Once I got home, I attached the wood with screws so that the 2x4s were attached to either side of the plywood.  At this point it you are planning on adding buttons, measure and drill holes into the plywood.

Headboard Frame

Next attach form to cover the plywood.  It is MUCH cheaper to use multiple square pieces over one large piece of foam.  I bought my foam on sale and they are 2 inches thick.  Once the foam is attached, use batting to covered the edges and staple to the back of the frame.  Lay out fabric on the floor and lay the frame on top.  Using your staple gun, pull the fabric tight and stapled to the back of the frame.  It is easiest to start in the center of one end and then go to the opposite side and pull tight.  Once you have completely attached the fabric, you can add buttons if desired.  To attach, screw the bottom of the 2x4s to your metal bed frame.

Completed Headboard

I will update with new pictures once I move in and attach it to my bed.

Important tip when choosing fabric!
Pay attention to the way the patten is laid out.  The original fabric I chose had a pattern that ran up and down when on the roll and it was not wide enough to use in that direction (i.e. if I used it the up and down would have run left to right and looked awkward). 


What I'm working on next:
Time to attach the 2nd matching dresser.  

Monday, April 23, 2012

My wine bar needs some love!

I have a wine bar and it is in desperate need of some accessories to pizazz it up.  Do you see those amazing wine cork projects? Whether wreaths or cork boards, I love the idea of recycling wine corks into great decor for your home.  I have been collecting corks for a year now and finally had a substantial size pile.  I decided that I would like to make some artwork for my new wine bar.  I began searching for the perfect wine quote.  It is amazing how many important famous people had a little something to say about wine (or any form of alcohol for that matter!)  I found the perfect quote by Alexander Fleming, credited with discovering penicillin.

Supplies
A piece of wood
Paint
Wine corks
Hot glue gun
Rope

What I did
First I painted a piece of wood that I had with a few coats of paint.  Once I found my quote, I printed it out in a font that I liked in a size large enough to see from a distance.  I placed the print outs on my wood and traced the letters with a pen which makes an indentation in the wood.  I then went back with black acrylic paint and hand painted the letters by following the lines I made from tracing.  This took 2 coats of paint to get a dark enough black.  After the paint was dry, I laid out my corks around the border.  I was short by 10 corks!!  Luckily I was going wine tasting with a friend and the owner graciously gave me a large bag of corks that was enough to do the entire project without the corks that I had collected.  I glued the corks in place.  I then decided that I wanted a little something extra and used rope that I had leftover and glued it around the border of the wood.


I love the sign!!  I am looking forward to using the rest of my corks for a great project in the future to compliment this.

After completing this, I still wanted a little more to add to the bar.  I have a lot of rope leftover from previous projects, and I was searching for ideas to use the rest.  I found great vases that were covered with colored yarn and thought why not do the same with rope?

Supplies
Glass vases--purchased form the Dollar Store
Rope
Glue gun

What I did
First make sure to clean and dry your vases.   I started at the top and glued the rope in place.  Continue to wrap the rope around the vase added glue every couple of inches until you get to the bottom.


This is a great and simple project you can do to jazz up a vase.  As mentioned before you can also use yarn.

What I'm working on next:
I have always wanted a unique headboard and now is the time to make one!

Friday, April 20, 2012

Window Panes

While at a dinner several months ago, I noticed the host has a beautiful and rustic window pane hanging above her couch.  At that moment I was in love and knew that in the future I wanted to find something similar.  I loved the way one rustic piece could transform a modern decor into something special.  I found old window panes at the Habitat for Humanity ReStore for $5.  They had windows of all shapes and sizes to chose from.  I knew that I wanted to do the windows in a couple of different ways.  I was inspired by posts on pinterest showing many uses for old windows. (http://dishfunctionaldesigns.blogspot.com/2012/01/reclaimed-windows.html)


Window before


Supplies
Window panes
Paint
Painter's tape
Contact paper
Scrapbook paper
Ribbon
Wooden monogram letter
Staple gun

What I did:

For both windows:  The windows were not in the best condition and had a lot of chipping paint.  First I removed all of the hardware.  Then I thoroughly cleaned them and tried to scrap off some of the chipping paint.  I then taped off the windows so I wouldn't get paint all over the glass.  Last I painted each window pane with 2 coats of paint.  I only painted the front of the windows because I knew that I was going to be covering the glass and you wouldn't see the back.

Window 1:  I used my leftover contact paper to cover each pane of glass.  Measure the inside of the panes and then cut the contact paper to size.  Carefully stick the contact paper to the glass and make sure to smooth out all of the bubbles.  You can use an exacto knife to cut off any areas where the paper overlaps the wooden frames.  I found a wooden monogram letter at Michael's that was already painted white.  The letters come in a variety of sizes and styles in black and white.  I attached a piece of ribbon to the letter and the frame with a staple gun to hang the letter in place.

Window #1 After


Window 2:  For the second window I found scrapbook paper on sale.  I cut each sheet to size and taped it into place.  I then drilled new holes to put some of the hardware back on so that I could use it to tie ribbon to and hang the frame.  I now can use this window as a dry erase board by writing on the glass with any dry erase marker.

Window #2 After


Window 3:  I currently am in limbo on the third window.  It has been painted but I'm not sure what else I want to do with it.  I may just leave it as is and hang it above my bed.

Window #3 After


What I'm working on next:
I have been collecting wine corks and I want to use them to make a decorative piece for my wine bar.

Wednesday, April 18, 2012

Old pillows become new again

Before I moved into my current apartment almost 2 years ago, I purchased pillow forms and fabric to add some color to my place.  As I am preparing to change up my decor for my new place, I am ready for a change in pillows as well.  We all have pillows that we once loved that need some refreshing.  New pillows are expense to keep replacing so why not just recover them?  You can change out the color scheme with the season or whenever you feel the need for a change of scenery.  It is far less expensive to buy a yard of fabric to cover a pillow than shell out $20 for a whole new pillow.  I decided to make simple envelope pillow cases that can be changed out easily (and more importantly cheaply!).

Supplies
fabric
old pillow forms
sewing machine


Tutorials:
http://raegunwear.blogspot.com/2011/06/tutorial-quick-envelope-pillow-case.html
OR
http://www.apartmenttherapy.com/how-to-sew-an-envelope-pillow-41722


 I made my pillows from leftover fabric from previous projects as well as purchasing some more coordinating fabrics.  I loved the chance to play around with colors and patterns.  You can also find great deals on hand towels, napkins, table clothes, or curtains and use them as your base for your pillows.  Square napkins are the easiest to make into pillows since they are already hemmed and a standard square pillow size.  Browse the isles of your favorite home stores (especially the clearance section) and see what inspires your next pillow creation.  Have fun with it.  If you hate it after a month, you didn't spend that much money on it!

What I'm working on next:
 I found some old window panes.  Not sure exactly what I'm going to do with them yet

Monday, April 16, 2012

The perfect desk chair......FINALLY!!

I've been on the hunt for a while now.  I've refurbished 2 chairs that didn't work but now I have the perfect chair.  I traded my sister the blue chair in a previous post for a beat up, stained, ugly chair that she stole from my parents when you moved into her new apartment.  I could see the potential.

Chair before


Supplies
Paint
Leftover fabric
Staple gun

What I did
The chair was this awkward pale avocado green that I was not a fan of.  In my efforts to save time I opted not to sand the chair before painting.....BIG MISTAKE!!  I don't know if this chair was stubborn or the finish was too fancy but it took way too many coats of paint to cover the chair.  I used leftover white paint and spent several days painting and waiting and painting some more.  I then took leftover fabric and covered the seat.  Be sure to pull the fabric tight before stapling so it is smooth on time.  After screwing the seat back to the fabric it was finished.

Chair after


Voila!  In love!  I love the chevron fabric and I know it will look perfect in my new apartment!!

What I'm working on next:
My coach pillows are in need of a makeover!!

Friday, April 13, 2012

Glam up a bookcase!

I have been busy adding some much needed pizazz to an old bookcase.  When I originally bought the bookcase, it was unfinished and I decided to stain it.  I was happy with the results but now its time for something new! 

Bookcase before
Supplies
Paint
Contact paper


What I did

The first step was painting.  I have a ton of paint laying around so this part was FREE.  After 2 coats of paint it was time to make this project a little special.

Bookcase after painting

While browsing the aisles of TJ Maxx I found beautiful gray contact paper with yellow flowers.  I love contact paper because A) it already has a sticky back so I don't have to get out glue and B) it has nice grid lines on the back that make it easy to measure and cut to size.  I measured the inside and cut the paper to size.  Don't worry if the cuts aren't exact....you can easily take an exacto knife and trim the paper after it is placed.  Peel off a little bit of the backing paper at a time and smooth the paper as it sticks.  I used a spatula to push out air bubbles.  If you have a stubborn air bubble you can lift the paper up and and try again to place it smoothly.

Bookcase after


Close up of the contact paper

I LOVE the finished result!!  The best projects are the ones that are inspired when you aren't even looking for inspiration!  Thank you TJ Maxx for the help!

What I'm working on next:
I have finally found the perfect desk chair!!!  Can't wait to finish it


Tuesday, April 10, 2012

Small apartment needs creative storage

I am moving in 4 weeks and I am very excited about decorating a new place (hence the plethora of craft projects!).  Unfortunately, my new apartment has about 200 less square feet than my current residence, and for a "stuff person"/hoarder like me, this requires some creative thinking for storage.  I was inspired by an article in Better Homes and Gardens where casters were placed on an old dresser drawer to provide storage that easily moves in and out from under the bed.  But honestly, who has extra dresser drawers laying around for this project?  However, when I was in ReStore a few weeks ago I found these large wooden drawers, probably for a kitchen, that were about 2x3ft and for $5 a piece I couldn't pass it up!!

Drawer before

Supplies
Paint
4 casters per drawer
Rope or drawer handles
leftover fabric
drill + drill bit
glue gun

What I did
First off I drilled holes for my handles.  I loved the idea of using rope for the handles so I just needed 2 holes on each drawer big enough to fit the rope in. After sanding and cleaning, i painted the entire drawer except the bottom inside with 2 coats of my leftover gray paint.  After the paint was dry, I added casters to each corner.  I placed the rope through the holes and tied each end on the inside.  I measured fabric for the inside and attached it with my glue gun.

Drawer after


Drawer after

I am IN LOVE with the finished product!  It is going to provide a ton of storage space in my new place without taking up valued floor space.  I even added a blanket to one to make a hide-away cat bed since my cat loves to nap under the bed.  She approves!

Chloe in her new cat bed

What I'm working on next:
I have an old stained bookcase that is in desperate need of a makeover!!

Monday, April 9, 2012

Nothing says "Welcome" like a gorgeous door!

My current  door is your standard, boring apartment door.  The only time I'm excited to see it is during Christmas time when it is adorned with a wreath I made last year.  So I started thinking, why should your door not be as cute year round as it is during the holidays?  I began searching for the perfect (and cheap) idea for a new project and found my inspiration on the following website: http://www.craftaholicsanonymous.net/t-shirt-pom-poms-tutorial.  Even better, I had all of the supplies I needed lying around my apartment.

Will be perfect on my door!  Just need to add a bow!


The Supplies
Old t-shirts
cardboard
picture frame

What I did
Following the instructions on the website, I made 3 t-shirt poms.  I then painted a frame that I had (because the previous color was an ugly textured gold).  When everything was put together, I had a great piece to hang on my door.

What I'm working on next:
Pack to painting!  I found some large drawers at ReStore that I am going to upcycle into under-the-bed storage containers.  

Sunday, April 8, 2012

Still on the hunt for a desk chair!

So you would think after the last chair I bought to go with my new gray desk didn't fit that I would start measuring chairs before buying them.....but its just not so.  This chair was found at Goodwill by a friend of mine.  The picture looked decent so I thought why not.  Well it of course doesn't fit, but it still needed some love.  Whoever painted this chair before me did a horrible job!  The paint rubbed off on my hands before sanding and I knew this would take SEVERAL coats of paint.  But nonetheless I had to do it.

Chair Before

I found a quart of pale blue oops paint at Home Depot.  It wasn't exactly the shade I was looking for so using my handy acrylic craft paint I tinted the blue to a color that I liked more.  After 2 long days of painting, there is vast improvement. 

Chair After
 I think having a bright colored chair always livens up a room.  Its the perfect shade for Easter.  Hopefully my sister (who I am giving the chair to) likes it!

What I'm working on next:
I've been inspired to make some sort of decor for my front door.  Come back to see what I come up with!

Friday, April 6, 2012

I have always wanted striped curtains!

Striped curtains have been very popular on Pinterest lately!  I've have wanted to make a set for many months now and I finally have the time to do it.  Warning: do not decide to make your own striped curtains until you have the patience to sit at a sewing machine for a few hours!


The Supplies
4 yards of white fabric
3 yards of colored fabric (in my case green)

What I did
I chose a thicker drapery fabric because I wanted the curtains to be a little heavier and block out some more sun for those months on night float when I will be sleeping during the day.  Be sure to pre-wash your fabric before cutting because it will shrink.  I cut my fabric into 1ft 1in strips.  Make sure your lines are straight before you cut so you don't have to correct it later while sewing.  My curtains are 9 stripes in length (I had to fold them over in the picture because the ceilings of my current apartment are not as high as my new place will be), but you can change the length by adding or decreasing the number of stripes.  Once all of the pieces are cut I assembled the stripes 2 at a time an sewed them together.  After all 9 stripes were assembled, I hemmed the sides.  I did not fold it over at the top or add fancy embellishments for hanging.  Instead, I used curtain clips to make the task easier.  I love the final look and I may make some for other rooms in different colors.

What I'm working on next:
I have another Goodwill chair that I am planning on bringing to life back to.  We will see how this goes! 

Wednesday, April 4, 2012

Dear Grandma I hope you don't hate what I've done....

As the first grandchild I had the pleasure of inheriting my grandmother's bedroom furniture.  This collection is old and it shows!  The handles have either rusted, fallen off, or broken over the years.  There are scratches all over, and basically it's just not my style.  I have wanted to give the dresser a makeover for years but I've been too afraid that I would hate the paint or ruin it and feel guilty (did I mention there are 5 other grandchildren that could have gotten these pieces?).  So I have finally gained the courage to get to work.


Dresser Before

Supplies:
Sandpaper
Paint
New knobs and handles
Drill + drill bit to size
Wood putty

What I did:
The handles on the dresser were an unusual size and I didn't find any in the same size that I liked.  The handles I found required me to drill new holes and to fill the old holes  with wood putty (please measure twice and drill once!).  The next step was sanding.  I am normally too lazy to sand things before I paint it, and most of the time I get away with it.  With this piece I actually took the time to sand and properly clean it because  A) the wood was very uneven and B) there was years of grime covering the dresser.  After sanding and cleaning off the dust, I did 2 coats of paint....be sure to allow paint to dry completely  between coats and before attaching new knobs.  Once dry I put the new knobs on and the piece was complete.

Dresser After

The bedroom set also includes a long dresser with a mirror and a bed frame then I plan to makeover in the near future!

What I'm working on next:
Thought I would take a break from painting for a while and move on to a sewing project.  I am in love with the bold striped curtains that are popping up everywhere so I am going to attempt my own.

Tuesday, April 3, 2012

So excited!!

Today I found out that Rachael Ray is following my boards on Pinterest!  For those of you who think I'm lame, oh well!!  Love her!  For those of you that say its just an intern running Rachael's page, why do you have to burst my bubble?!?  Now if I can just get her to follow my blog.....then I could become famous and I would be one step closer to Nate Berkus!!!

Where does my inspiration come from?

I have been asked for a lot of DIY/design advice lately (thanks guys!!) and I have often been asked how I come up with these ideas.  Well lucky you I am going to share my secrets!!

1. Pinterest
This is obvious!  With the Pinterest rage its easy to be inspired by new ideas or ways to use old things in a new way.  I have WAY to much free time on my hand and often spend hours at a time looking for new pictures and ideas to pin.  What most don't think about is using ideas indirectly.  For example: You love the striped or chevron curtains/bedding but instead of just using that inspiration on fabrics why not paint a bookshelf or desk in the pattern?  I also love looking at style pictures for color inspiration....people are often bolder in fashion than they are willing to be in their home decor.  

2. Design Notebook
Yes I have an entire notebook (actually its several binders) dedicated to ideas that inspire me.  When ever I get a new magazine and see something I like I just rip out the page and add it to the book.  This is a great way to pull multiple ideas together and have a visual (for those that are not good at visualizing).

3. The Fabric Store
You can see the greatest color and pattern combinations just by browsing your local fabric store. I especially like seeing fabrics with a traditional print in a bright and modern color scheme.

4. HGTV
Quite possibly my favorite channel ever!  Great place to get inspired!  Even if a room is designed on a budget 10x your yearly salary there are always elements you can take away and do on a budget.  I love to watch The High/Low Project for that very reason.  Why should fabulous design be left to the rich?

5. Nature
Some of the best color combos are the ones you see in nature.  Blue + Green where the sky meets the grass.  Great shades of yellow, orange, and red as the sun is setting. The browns and oranges of fall.  Why not use these great combos in your home as well?  Just step outside and pay attention to the colors around you!

6.  Artwork and Bedding
Not sure where to start?  You can always start with your favorite piece of artwork or bedding that you absolutely love.  Draw colors from these pieces and run with it!  Play around with colors that you don't think will work that in the end are fabulous!

7. Paint chips
In a perfect world I could run into the paint section of my local home improvement store and throw all of the paint chips into the air and see where they land.  I bet you would make some wonderful color groupings that way!! Since I would probably be banned for doing this I will settle with spreading a bunch of paint chips all over my dining room table.  Play around.  You love orange 302 why not see what it looks like by blue 401.  Have fun.....they are free after all!

So go out there and get inspired!  Find what makes you happy and makes you want to start a new project.  Keep of a log of your favorite ideas.  Get creative!!

Monday, April 2, 2012

Coffee Table Turned Ottoman

I have been in love with large ottomans in front of couches for a long time.  Who doesn't love the option to comfortably prop your feet up when lounging on the couch and of course my cat loves any soft surface to nap on.  The only things that has stopped me from investing in one are A) the are super expensive for my student budget and B) I can never find one in a fabric I like. 

So what does any good DIYer do?  Make one of my own!  I had this IKEA coffee table for about 4 years now.  I tried to give it a makeover once by painting it but I quickly got sick of it and it has been stationed under my bed in piece for months.  I had forgotten all about the table until recently when I had seen posts on Pinterest about making your own ottoman from a coffee table.  I thought "I can do that!" and so it began.

Coffee Table Before

For a few dollars I was able to transform an ugly table into a comfortable ottoman.

Supplies I used: 
2 yds of upholstery fabric (I could have gotten away with 1 1/2yds but I love have scraps)
2 2" foam cushions
Batting
Glue gun
Staple gun
White paint

How you can make your own:
First I touched up the legs.  They were already white but had gotten scratched up a bit.  One coat did the trick.  Next I cut my fabric to size (make sure you prewash the fabric!).  I glued the foam pads to the table just so they wouldn't move when I flipped it onto the fabric.  I stapled the batting to the table first.  Then I began stapling the fabric.  I folded the fabric neatly before stapling it so I would have clean lines underneath the table.  Then voila!

Ottoman After

My new ottoman is so adorable and comfortable!  And my cat is in love!  There is a shelf that fits in but I haven't decided if I  like it enough to put it in yet.

What I'm working on next:
I have inherited (sounds fancy right?) a bedroom set from my grandmother.  It has been in DESPERATE need of a makeover for decades but I have been a bit timid to touch it until now (because God forbid I screw it up and I have siblings and cousins hunting me down for ruining family furniture!).  I have decided to start with a tall dresser for now.  Tune in for the final product!